This is the layout I taught at Studio J Boot Camp!

Watch my tutorials to learn these techniques or schedule a one-on-one Studio J session with me.

There are so many benefits to memory keeping the Studio J way!

I love that Studio J allows us unlimited My Stickease and embellishments. We can even resize them...can't do that with our classic supplies.

Use Studio J to create hybrid pages.

Let me show you how to dress up a Studio J page with a little bling! I added Bitty Sparkles to this page.

Let your creativity shine with Studio J!

Take my face-to-face classes or watch my video tutorials to learn advanced Studio J techniques such as creating your own background paper using text boxes.

Studio J is your best friend if you are short on time.

Drop in your photos, color the toggle accents, add a title and journaling, print...it really is that easy! Let me show you how.

Saturday, December 31, 2011

Happy New Year!


I hope that 2012 finds you happy, healthy, and ready to preserve your precious memories through scrapbooking.  I’m committed to making this the year that I tell the stories I don’t want to forget.  I've always been an event scrapper, and that won’t change, but I’m also going to capture the small moments that make life worth living.  I’m even going to scrapbook stories that don’t have photos…I know…gasp!  I can do this!

I’m taking the Big Picture Classes course, Twelve, with Stacy Julian.  NOTE:  Just noticed the class is live, so I need to hurry up this blog post!  W00T!  BPC has a Refer-a-Friend reward system.  If you use my code (E5FD6D3E) when you register for your free account on the site, we will both earn a 10% discount after you purchase your first class.

So, you may have noticed that I took a break after posting my Thankful for Studio J series every day in November.  I was busy working on some Christmas gifts, including this awesome calendar for my mother-in-law.  Here is another reason why I love Studio J…you can create two completely different looks on the same layout using text boxes.  All I had to do was fill the text boxes with patterned paper, change the color of the paper, send it behind the photos, and embellish to my heart’s content.  I’ll post photos of the completed calendar 
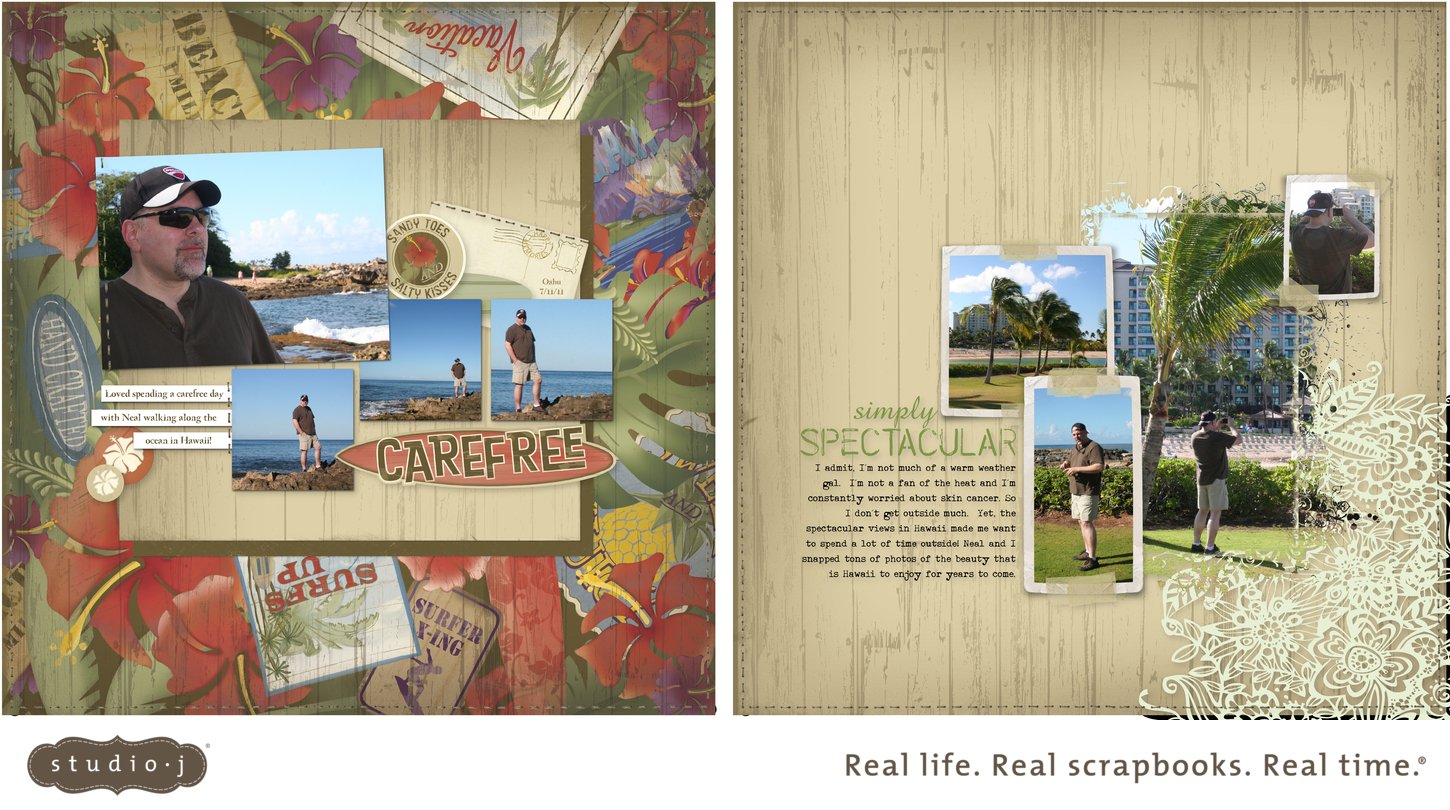
later, but here is a quick look at the layouts.

February & January
(Seriously, how cute is my husband?!)

December & March

April & August

May & June

July & October

September & November

Watch for my newsletter tomorrow as I’m having a Rock the Block party on Saturday, January 14!  I would love for all the locals to join me at my home, but also am going to find a way for you out-of-towners to join in the fun.  Stay tuned.

Also, keep an eye on Jeanette Lynton’s blog.  She is going to announce how her blog readers will be able to participate this year!  CTMH recently announced that they are no longer offering the Make It FromYour  Heart contest for consultants, so my guess is that she will be offering prizes for people who submit artwork based on her blog posts.  That means that EVERYONE will be able to participate, not just consultants!

I tell you…2012 is going to be an amazing year!  Bring it on!  

Thursday, December 1, 2011

Studio J 5-Pack Winner


I’m so excited to start this holiday season by giving away a FREE Studio J 5-Pack!  Watch this video to see if you are the lucky winner.  If you missed the chance to enter the giveaway, be sure to subscribe to my blog, Facebook page, and/or Twitter feed so that you don’t miss my next big giveaway!


Wednesday, November 30, 2011

Why I’m Thankful for Studio J #30—Member Benefits

I spent this month sharing with you some of the reasons why I’m thankful for Studio J. On the last day of the month, I’m working on finishing up my layouts so that I can enjoy one of the perks of membership…free shipping! I love that I only have to purchase 4 layouts to receive free shipping but can fit as many as 20 in one box. That’s 40 pages for my albums and I don’t have to pay a cent for shipping. Woo hoo!


Today is also the last day to sign up for my Studio J 5-Pack giveaway by leaving a comment on the blog post that started this entire series, 30 Reasons Why I’m Thankful for Studio J. I will post the winner tomorrow evening!


Tuesday, November 29, 2011

Why I'm Thankful for Studio J #29--Warning Symbols

I'm thankful that Studio J gives me warning symbols when I'm using low quality photos.  When I try to resize a photo that doesn't have a high resolution, Studio J pops up the yellow warning sign.  I'm even more thankful for the fact that I can simply ignore the warnings and that they won't print on my final layout.  Sometimes I don't mind having a blurry photo on my page because it tells a story.  In this example, the images on the right were a screen capture from a TV station aired over the Internet...it's not surprising that the quality is low.  Yet, I'm still going to use the photos, because it is a record of my brief experience on Star Trek: Enterprise!

Don’t forget to leave a comment on the giveaway blog post to have a chance at winning a FREE Studio J 5-Pack (includes 5 layouts, page protectors, and shipping).  With only 1 day left, your chances are really good as there are only 19 comments on that post, so hurry up and click on over there!

Monday, November 28, 2011

Why I'm Thankful for Studio J #28 ~ Photo in Multiple Wells

Studio J gives us lots of ways to create visual impact with our favorite photos.  A fun technique involves placing the same photo in multiple photo wells to create an enlargement of the photo.  In the Grill Masters layout, I love the focal photo of my husband showing off pans of freshly seasoned beef.  Yet, the story is really about how he and my brother-in-law were in a grilling cook off.  I wanted their photo to carry almost equal weight as the focal photo, so I placed it in four different photo wells to create an "enlargement."  The steps to accomplish this are really easy:

1)  Select the photo you want to "enlarge" and drop into one of the photo wells.
2)  Increase the scale until the "ghost" image covers all four photo wells.  My photos are at 220%.
3)  Move the first photo into place and repeat.
4)  Once all four photos have been resized, you are able to move them around by grabbing the hand/move icon in the middle of the photo.  A "ghost" image will appear that will allow you to line up all four photos.  It helps to zoom way in so that you can really see what you are doing.

Don’t forget to leave a comment on the giveaway blog post to have a chance at winning a FREE Studio J 5-Pack (includes 5 layouts, page protectors, and shipping).  With only 2 days left, your chances are really good as there are only 19 comments on that post, so hurry up and click on over there!

Sunday, November 27, 2011

Why I’m Thankful for Studio J #27—Changing Paper Colors


Like I showed you yesterday, Studio J gives me lots of creative control.  In classic scrapbooking, if my photos don’t match the paper, I have to turn my photos black and white or sepia.  Not so with Studio J!  In Studio J, I can change my background paper to fit the color of my photos!  I have the entire Close To My Heart color palette to play with…that’s 60 colors!  Now, the only limitation is that we can’t change the color of My Stickease, but with so many other embellishments available to us, I don’t see this as a problem at all.  I would love to see the layouts you create on my Facebook page, so be sure to upload your favorites and show me how you changed the color of the paper on your layout!


Don’t forget to leave a comment on the giveaway blog post to have a chance at winning a FREE Studio J 5-Pack (includes 5 layouts, page protectors, and shipping).  With only 3 days left, your chances are really good as only 16 people have left comments on that post, so hurry up and click on over there!

Saturday, November 26, 2011

Why I'm Thankful for Studio J #26--Creativity

I've talked about how amazing Studio J is when you are short on time or new to scrapbooking.  It really can be as easy as dropping in photos, coloring embellishments, adding a title and journaling.  Yet, Studio J also lets our creativity shine when we have more time to spend.  For instance, last night I decided that I wanted to learn how to make graph paper in Photoshop, so I did!  I used the RGB codes for a Colonial White background and Chocolate grid to create my custom graph paper that will match the CTMH papers in Studio J.  As I look at it now, I wish I would have added a little distressing, but luckily I can do that in Studio J.

So, after creating the paper, I thought about a layout I had seen on page 24 of the November/December 2011 edition of Creating Keepsakes.  I loved the circles that were cut out of the paper.  I did the same on my graph paper and put a little drop shadow behind the circles.  I figured out which photos I wanted to use and created my photo mats.  You can download the layered Photoshop file under my Freebies tab and watch this video to see how to add your own photos.


I really want to see what you create with this file (and my other Freebies!), so please post your completed layout to my Facebook page!


Don’t forget to leave a comment on the giveaway blog post to have a chance at winning a FREE Studio J 5-Pack (includes 5 layouts, page protectors, and shipping).

Friday, November 25, 2011

Why I’m Thankful for Studio J #25—Layers


Like our classic layouts, Studio J lets us layer papers and embellishments to create clusters that enhance the visual impact of our layouts.  The key to successful layering is the right-click button on your mouse!  Right clicking allows you to send items to the front or back of your layout.  You may also send items forward or backward one layer at a time.  It often takes many right-clicks to send items forward or backward, so it does take a bit of patience.  This video tutorial gives you a quick example of layering in Studio J.

Don’t forget to leave a comment on the giveaway blog postto have a chance at winning a FREE Studio J 5-Pack (includes 5 layouts, page protectors, and shipping).

Thursday, November 24, 2011

Why I'm Thankful for Studio J #24--Everyday Life

I hope you all had an amazing Thanksgiving with your families and friends!  I spent a fantastic day with my husband and our dear friends, Jan and Eric.  These are the moments that fill my albums--holidays, vacations, and special events.  I rarely took the time to scrapbook everyday life until Studio J.  Now I feel free to tell the stories that matter the most.  I hope you will take some time to scrapbook about your everyday life.

Don’t forget to leave a comment on the giveaway blog postto have a chance at winning a FREE Studio J 5-Pack (includes 5 layouts, page protectors, and shipping).

Wednesday, November 23, 2011

Why I'm Thankful for Studio J #23--Studio J Art Department

I'm really thankful that Close To My Heart has such amazingly creative people working in their Art Department.  I so look forward to scraplifting the layouts they post on the Studio J blog, Studio J splash page and in the Idea Book.  The Autumn/Winter 2011 Idea Book includes a Studio J layout for every paper pack...I love that!

By scraplifting these darling layouts, I not only get great pages for my albums, I often learn a new tip or technique.  Here is one of my favorite scraplifts from page 11 of the Autumn/Winter 2011 Idea Book.

Today, they posted the "An Attitude of Gratitude" layout on the Studio J blog, and I can't wait to scraplift it this weekend!  I have been wanting to try the Honeycomb pattern, so this is a perfect time to create an awesome layout celebrating all the blessings in my life.

Notice the cute ribbon technique?  I'll share a video tutorial on that later this weekend.

Don’t forget to leave a comment on the giveaway blog postto have a chance at winning a FREE Studio J 5-Pack (includes 5 layouts, page protectors, and shipping).


Tuesday, November 22, 2011

Why I'm Thankful for Studio J #22--Photo Distressing

Have you ever wished you could distress the edges of your photos in Studio J?  Through the magic of text boxes, you can!  Simply add an empty text box on top of your photo and drop in the distressing.  You can give your photos a subtle border or age them by applying sanding or stubble.  At the Close To My Heart Studio J Boot Camp, the fantastic teachers taught us how to create our own background paper by placing My Stickease on cardstock and then layering a text box with stubble distressing on top to blend the two. This is one of my favorite techniques, so here is a quick tip video to help you start distressing your photos today!


Don’t forget to leave a comment on the giveaway blog postto have a chance at winning a FREE Studio J 5-Pack (includes 5 layouts, page protectors, and shipping).

Monday, November 21, 2011

Why I'm Thankful for Studio J #21 ~ Fun with Ribbon

It's so easy to create flowers out of ribbon tabs in Studio J.

Simply click on the Ribbons menu under Embellishments and choose your favorite color.

Scroll down to the flat knot and drag onto your project.

Drag another flat knot onto the first and rotate it slightly.

Continue this process until you have a flower!

You can place a My Stickease on top to finish off the look like I did here or add other embellishments such as buttons or brads.

As you can see, this is a quick and easy way to add a lot of impact to your Studio J layouts.

Don’t forget to leave a comment on the giveaway blog post to have a chance at winning a FREE Studio J 5-Pack (includes 5 layouts, page protectors, and shipping).

Sunday, November 20, 2011

Why I'm Thankful for Studio J #20--Customizing Patterns


I love the 63 patterns that are currently available to us in Studio J.  Some of the patterns can be found in Jeanette Lynton's How-To books, but some are exclusive to Studio J.  We can sort the patterns based on the number of photos we have and rotate or swap the patterns to get a variety of looks.  Yet, through the magic of text boxes, we can customize our patterns even more!  Watch this quick tip video to see how you can give a "busy" layout a linear look.

Don’t forget to leave a comment on the giveaway blog post to have a chance at winning a FREE Studio J 5-Pack (includes 5 layouts, page protectors, and shipping).  As of today, we only have 13 comments on that post, so your chances of winning are really good.

Saturday, November 19, 2011

Why I'm Thankful for Studio J #19--Family Scrapping

I met with one of my friends and her husband and kids last night to talk about Studio J.  We logged in, started a new project, uploaded a few photos, and created her first layout.  As I was leaving, I told her husband that I expected to see a layout that he created the next time I come over.  I really wasn't joking!  Studio J is perfect for the entire family.  It is neither gender nor age specific.  Studio J is ideal for anyone who takes digital photos and wants to preserve the moments of their lives.  Studio J makes it so easy to archive our photos and record our memories.  The bonus is that we get REAL scrapbook pages in return!

Please leave a comment on this post letting me know about the non-scrapbookers in your life who have tried Studio J.  Better yet, post their layouts on the Studio Scrapping Facebook page!

Don’t forget to leave a comment on the giveaway blog post to have a chance at winning a FREE Studio J 5-Pack (includes 5 layouts, page protectors, and shipping).  As of today, we only have 13 comments on that post, so your chances of winning are really good.

Friday, November 18, 2011

Why I'm Thankful for Studio J #18--Hybrid Pages

Studio J is such a fantastic design studio for my hybrid pages!  Nine times out of ten, I know that I'm going to add some form of bling to my Studio J layouts.  I simply design the layout with all the digital elements in place, and then I make a copy of the layout into a "print" project on Studio J.  I remove any of the digital elements that I know I'm going to replace with my classic supplies.  By making a copy of the project, it will allow me to go back to the original design so that I can remember where I want to put the ribbon, brads, buttons, pearls, My Stickease, and more.  Did I mention sparkles?!  I love adding all of our assorted colors of sparkles to my Studio J layouts, but I'm particularly fond of the Bitty Sparkles!  Can't get enough of them on my hybrid layouts!  Here are some close up photos of the bling I added to the Studio J layout above.


Don’t forget to leave a comment on the giveaway blog post to have a chance at winning a FREE Studio J 5-Pack (includes 5 layouts, page protectors, and shipping)!

Thursday, November 17, 2011

Why I'm Thankful for Studio J #17--Exclusive Content

I'm thankful that Close To My Heart provides exclusive content for Studio J users and members.  We have access to kits that can only be found in Studio J.  Some of these kits are for members only, but there are also several that may be used by anyone.


Log in to Studio J today and try it for FREE; I can't wait to see what you create!  

Don’t forget to leave a comment on the giveaway blog post to have a chance at winning a FREE Studio J 5-Pack (includes 5 layouts, page protectors, and shipping)!

Wednesday, November 16, 2011

Why I'm Thankful for Studio J #16--Retired Kits

You know how sometimes you love a paper packet so much that you simply can't cut into it?  When the line retires, it feels a bit like losing an old friend, so you buy as much as possible and then hold on to it for dear life?  No?  Maybe it's just me!

Honestly, that is how I felt about Giggles & Grins.  It was one of the first kits I ever purchased as a CTMH customer.  I love theme parks, so I used it for a lot of Disney layouts.  When it retired, I grabbed up as much of it as possible and have been holding on to it since then.  You can imagine my delight...and, frankly, relief when CTMH released the kit in Studio J!  I no longer have to horde my Giggles & Grins paper because I can use it as much as I want on Studio J!


Don’t forget to leave a comment on the giveaway blog post to have a chance at winning a FREE Studio J 5-Pack (includes 5 layouts, page protectors, and shipping)!

Tuesday, November 15, 2011

Why I'm Thankful for Studio J #15--Resizing Embellishments

There are some things about Studio J that can't be accomplished using our paper supplies.  One of my favorites is Studio J's ability to easily change embellishment sizes.

In this photo, I converted the stitching to 66%.  I still had to crop a bit off the excess stitching to create a frame around my photo.  Once I had completed one side, I simply copied and pasted to create the stitched frame. 


We can do the same thing with My Stickease images.  The dark purple flower has been reduced to 60% of the original size.  I did the exact same thing with another cluster on the right page.


In addition to reducing the size of My Stickease, we are also able to increase the sizes.  This stitching is now at 163%.

Monday, November 14, 2011

Why I'm Thankful for Studio J #14--Love Your Layout Videos

I love that Close To My Heart provides us with the Love Your Layout video series.  These videos share tips and tricks each month while showing us some beautiful layouts created by the art department.  Here is the latest video using the Dreamin' kit!


Don't forget to visit the 30 Reasons Why I’m Thankful for Studio J + a Giveaway blog post to enter my giveaway for a FREE Studio J 5-pack! There are several ways to enter but you must post on that blog post to win. The drawing will be held on November 30, 2011.

Sunday, November 13, 2011

Why I'm Thankful for Studio J #12 & #13--Free & Free

I've been fighting a major headache since yesterday so have been sleeping a lot. I'm sorry if you were waiting for my post yesterday! I'll make up for it by posting two today.

 #12--I'm thankful that Studio J is freely available on the Internet. Anyone is able to sign up for a free account and create to their hearts content without ever purchasing a layout! This makes it a true design studio. I'm able to use Studio J to design layouts that I may either order online or create with my classic supplies.

#13--I'm also thankful that all the licensed CTMH patterns and images are free in Studio J! Not only do we not have to pay for software, we also don't have to pay for individual kits or images. Many other companies charge per sheet of digital paper or individual embellishment. CTMH is providing all their licensed images to us at no additional cost! As soon as a new Idea Book launches, all the new kits are loaded in Studio J. The only thing you ever have to pay for is the actual printed layout. I wish I felt better, because I would do a cost comparison of other digital scrapbooking programs out there. I think you would be shocked at what a steal we have with Studio J!

I will share with you one of my older tutorials that explains the cost benefits of becoming a member. In addition to all the cost saving benefits of membership, I also provide my members with incentives. I hold a monthly class for members only where we work on layouts and I teach tips & tricks to get the most out of Studio J. I also have an incentive program for every 10 layouts you purchase, I give you a prize...after 50 layouts, you get an album for all your layouts! You don't have to be local to me to enjoy these member benefits, so I hope you'll let me know when you are ready to become a member!

Friday, November 11, 2011

Why I'm Thankful for Studio J #11--Unlimited My Stickease

In honor of Veterans Day, I'm using this layout I created after visiting Arlington National Cemetery in the summer of 2010.  My father is buried there as is my niece's other grandfather.  My sister and I were able to visit both graves, as well as, take the bus tour.

I love the following quick tip because it shows you one of the many uses of My Stickease within Studio J!  You can rotate it, crop it, cluster it, resize it, and more. This is another money saving advantage of Studio J, because you have unlimited access to My Stickease.  There is no worrying about running out with Studio J!

Don't forget to visit the 30 Reasons Why I’m Thankful for Studio J + a Giveaway blog post to enter my giveaway for a FREE Studio J 5-pack! There are several ways to enter but you must post on that blog post to win. The drawing will be held on November 30, 2011.

Thursday, November 10, 2011

Why I'm Thankful for Studio J #10—PNG Files


Did you know that Studio J accepts transparent PNG files?  This is so fantastic for those of us who download or purchase digital products online. When you drop a PNG file in a photo well, the background paper shows through.  Here is an example using Katie Pertiet's Postage Frame Clusters


I've had so much fun playing with these transparent files that I decided to create my own and offer them as a freebie on my blog.  I hope you will download the file, watch the video, and make your own creation.  Please post it on my Facebook page to share with the Studio Scrapping community!


Learning how to use PNG files will also help you get the most out of the No Limits layout as I did in these layouts about Hawaii.


Don't forget to visit the 30 Reasons Why I’m Thankful for Studio J + a Giveaway blog post to enter my giveaway for a FREE Studio J 5-pack! There are several ways to enter but you must post on that blog post to win. The drawing will be held on November 30, 2011.

Wednesday, November 9, 2011

Why I’m Thankful for Studio J #9—Fits into a Busy Life

The number one complaint I hear from people who would like to scrapbook is that they simply don’t have time. That makes perfect sense…most of us are busy living our lives and creating the memories we want to scrapbook. This is yet another reason why I’m so thankful for Studio J! It saves me time in that I don’t have to figure out sizes or get my photos printed ahead of time, I don’t have to lug out my scrapbook supplies, and I don’t need hours at a time to create one layout. In fact, by simply devoting 5-15 minutes a day, I can complete a few layouts in a week!

Here is my process:

  1. On the weekend when I have a little more time, I go through my photos from the week and decide which stories I want to tell. I then create a new project in Studio J for that story and upload the photos. If I’m not inspired or don’t have many photos from the week, I’ll take a look at some of my older digital photos. 
  2. The next step is to record the memory I want to keep. I open a Word file and type my story. I save it in a Journal folder using the same name as my Studio J project name. 
  3. Those two steps are the "hard" part; with them out of the way, I can start creating my layouts! 
  4. If I’m really short on time, I simply place a project or two in my cart and go through the approval process. If I decide I need to come back to it later, I remove it from the cart. My approved layouts simply hang out in the cart until I’m ready to purchase them at the end of the month. 
Again, with nothing to put away, I can spend 5 minutes on a layout, log off, and come back to it the next day. I don’t lose my train of thought, because the journaling was completed on a different day in one sitting. By completing each task on a different day, I’m able to get my daily scrapbooking fix without devoting a lot of time I don’t have. So, no more excuses about not having time, Studio J fits in to even the busiest schedule!

As I’m exhausted from my busy week and 8 hour drive home today, I decided to focus on journaling. I was reminded of the time my tire had a blowout on the way to Portland and wanted to tell that story. I’ll share the next step of the process with you tomorrow.

Don't forget to visit the 30 Reasons Why I’m Thankful for Studio J + a Giveaway blog post to enter my giveaway for a FREE Studio J 5-pack! There are several ways to enter but you must post on that blog post to win. The drawing will be held on November 30, 2011.

Tuesday, November 8, 2011

Why I’m Thankful for Studio J #8—Journaling

Okay, raise your hand if any of this applies to you:
  1. You hate your own handwriting, so you don’t journal.
  2. You hate your own handwriting but don’t have time to type up your memories, so you don’t journal.
  3. You eventually plan on typing up your journaling, so you have a pile of partially completed layouts waiting for that finishing touch.
  4. You figure a picture is worth a thousand words, so why bother journaling!
Well, I’ll tell you why…our photos only tell part of the story. If we are really amazing photographers, they may be able to get the emotion of the story across, but they usually need the help of our unique points of view.

I scrapbook to remember. It really is as simple as that. I don’t want to forget my life when I’m old, so I’m documenting the things that are important to me now. They may not be important to me then, but I will see how my life has progressed through both photos and words.

That is yet another reason why I love Studio J. Prior to purchasing my layouts, I must complete my journaling. No longer do I have piles of layouts waiting for journaling (well, not entirely true, I still have the piles from my pre-Studio J days!), Studio J helps me record my memories now. I can write as much or as little as I want thanks to the ability to add text boxes or convert text boxes to photo wells.


In this layout, I added text boxes to create strips of cardstock that I adhered to the layout using stitching, staples, and brads in the same way I would a classic layout.


Journaling can help us work though loss, and Studio J made it so easy to tell this story about the final great adventure of my cat, Kit.

My wish for you is that you share the stories of your life by embracing all the journaling options Studio J has to offer. I’m also looking forward to giving away a free Studio J 5-pack, so visit the 30 Reasons Why I’m Thankful for Studio J + a Giveaway blog post to enter! There are several ways to enter but you must post on that blog post to win. The drawing will be held on November 30, 2011.

Monday, November 7, 2011

Why I’m Thankful for Studio J #7—Image Editing

If you have followed my blog or watched my YouTube videos, you will know that I’m a Photoshop fan. I love manipulating photos and have developed some mad skills…here is an example of my lovely hourglass figure courtesy of Photoshop!
Yet, even as a diehard fan, I don’t always want to take the time to edit my photos in Photoshop. That is why I’m so thankful for the editing tools in Studio J!

Studio J allows us to quickly adjust brightness, contrast, hue, saturation, and sharpness. We can also create our own presets to use later. Studio J provides us with great tools to touch up our photos. My favorites are redeye remover and the toothbrush…I love being able to freshen up a smile in my photos so that my family is focused on the memory and not the color of their teeth! Other editing tools include airbrush, blemish, glare, and wrinkle.

CTMH hasn’t given us the liposuction tool yet, so I won’t be giving up Photoshop anytime soon, but I sure do appreciate the time I save by doing my basic photo editing inside Studio J.

If you would like to see the editing tools in action, watch my CTMH Studio J Tutorial #4 (Photo Editing).  I demonstrate the blemish remover, how to brighten smiles with the toothbrush, ways to reduce glare, and magically erase a wrinkle with the wrinkle tool!

Don't forget to visit the 30 Reasons Why I’m Thankful for Studio J + a Giveaway blog post to enter my giveaway for a FREE Studio J 5-pack!  There are several ways to enter but you must post on that blog post to win.  The drawing will be held on November 30, 2011.

Sunday, November 6, 2011

Why I'm Thankful for Studio J #6--My Stickease as Templates

I'll share a few more tips about how you can use My Stickease this month, but one of my favorites is to use it as a template for creating other shapes with embellishments.  Prior to Close To My Heart releasing the stitching embellishments, I used a heart My Stickease to create a stitched heart.  Watch CTMH Studio J Tutorial #7 (A Few Quick Tips) to see an example of how it was done. 
I also used a large My Stickease to create a heart out of buttons on the High School Graduate layout.  The steps are very simple:
  1. Choose the My Stickease image you want to use as a template and place it on your layout.  Remember that you can grab the rotate button in the upper left corner of the image to rotate the My Stickease.
  2. Select Buttons from the embellishments toolbar and start placing your buttons around the outside edges of the My Stickease image.  Speed up the process by placing the thread in your button, select both the thread and button, copy, and paste.  Both the new thread and button will be selected, so move them into place together.  Don't forget that you can use your arrow keys to nudge items into place! 
  3. Once your buttons are in place, delete the My Stickease image.  You are left with a perfect heart of buttons.  Add a little more flair to your button heart by replacing a button with a couple flat knot ribbons.
  4. If you want to make sure that all of your buttons are evenly spaced, simply pull a brad onto your layout and use it as a spacing guide between buttons!
Don’t forget to leave a comment on the giveaway blog post to have a chance at winning a FREE Studio J 5-Pack (includes 5 layouts, page protectors, and shipping)!

Saturday, November 5, 2011

Why I'm Thankful for Studio J #5--Stitching

My favorite quote of the day came from my sister who is recovering from open-heart surgery. She stated emphatically, "no one in their right mind should have their chest cracked open." You think?! Speaking of things that need to be stitched--how do you like that transition--I'm thankful for the stitching tools in Studio J.

Prior to the stitching tools, we had to use the threads from the button embellishments toolbar to lay down stitches one at a time.  It was such a long process that I added the Creating Stitched Patterns on Cardstock tutorial to my Fussy Techniquesplaylist.  Several days after I posted the tutorial, Close To My Heart released the stitching toolbar under embellishments!  I couldn’t even be upset that I had wasted time creating the video, because I was so happy to have stitches in Studio J.

Now we can easily add several types of straight stitches (cross, zig-zag, back, running, blanket, and scallop) to our layouts.  We also have pennants (banner, triangle, and scallop) and specialty shapes, such as stars, hearts, posy flowers, blossom flowers, squares, and circles, in a variety of sizes.

By clicking on the layout of my sister in Hawaii last summer, you will see a variety of the stitches in action. 


Don’t forget to leave a comment on the giveaway blog post to have a chance at winning a FREE Studio J 5-Pack (includes 5 layouts, page protectors, and shipping)!

Friday, November 4, 2011

Why I'm Thankful for Studio J #4--Free JPGs

There is so much to love about my Studio J membership.  From the 1/2 price layouts to exclusive content to free shipping, what's not to love?  But my favorite part of the membership is the fact that I get free JPGs of every layout.  Within roughly 20 minutes (depending on how backed up the servers are) of ordering my layouts, I'm able to log into my account and download the free JPGs.  I'm then able to instantly upload the web-ready version to my blog and Facebook pages.  I can also easily email my layouts to friends and family to share memories with them.

Yet, it gets even better as Close To My Heart also sends me high-resolution JPGs of each side of the layout.  If my mom wants a copy of this layout, I can simply send her the high-resolution JPGs which she can drop in the No Limits layout on her Studio J membership and order her own copy.  We can also upload the JPGs to her photo frame so the whole family can share in the fun!

I also enjoy making 6x6 gift books using our board book and reducing the JPGs to 6x6 images in Photoshop.  I'm able to get 8 pages of the mini-album on one layout to drop into No Limits for printing.
If you want to learn more about the benefits of membership, be sure to watch the following:


Don’t forget to leave a comment on the giveaway blog post to have a chance at winning a FREE Studio J 5-Pack (includes 5 layouts, page protectors, and shipping)!

Related Posts Plugin for WordPress, Blogger...
Twitter Delicious Facebook Digg Stumbleupon Favorites More